• Jul
  • 22
  • 2013

{guest post} Gold 4 Glamour Party


I have always admired her DIY creations, and when this one came up, I said to myself I have to feature this on my blog! This party was styled by my friend Elcin from Jellybean in My Closet for her dear sister. Delectable mouth watering desserts were made by Eda and photography by Sibella .

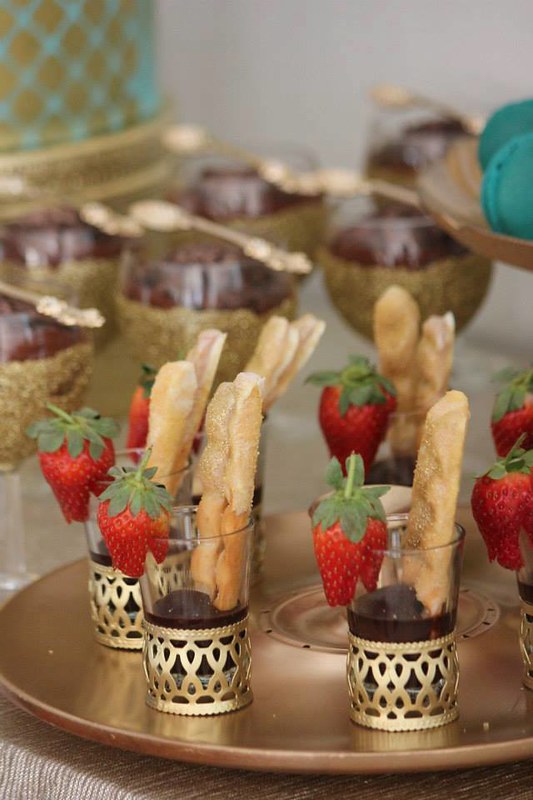
She has named her event Gold 4 Glamour. The colours Elcin has chosen for this event are simply glamorous, vibrant and exciting! What I am impressed most about this party styling is that Elcin pretty much DIYed most of the items on the dessert table herself, from things that she found from second hand shops such as a napkin ring- she turned them into dessert cups. Such an innovative idea!


Since Eid is coming up, I thought I’d let her share some of her DIY tips and How To’s. Below are her 5 top tips on creating a successful DIY Tea Party.


1. Keep it simple.

When it comes to party décor, you’re either making a statement piece (wall art, centrepiece etc) or multiples of something (drink bottles, hanging décor etc). For this reason, I recommend keeping the process of making it simple. If there is an easier way of doing something, go for it!


2. Google!

Whenever I have a DIY idea, I get onto Google or Pinterest, because 9 times out of 10, somebody else has already thought of the same idea. You can pick up some great tips and things to avoid when attempting your DIY.


3. Think outside the square.

Look at pieces from a different angle. When I saw the napkin rings & the candle holder at the op shop, I fell in love. I knew I didn’t need them for the purpose they’ve been made but began to think of how else I could use them. The napkin rings made a fantastic dessert cup and the candle holder a pretty vase!


4. Plan it.

Once you have done step 1-3, now you can plan it! Choose your theme. Once I have a theme in mind, I look around my house to see what items will work with my theme. You’ll be surprised as to what you have! Time is imporant. If you are planning an event 3 months down the track, plan for it 3 months ahead. The planning and preparing won’t take you 3 months, (the gold party prep took no more than 1 week) but at least you will be giving yourself plenty of time for shopping and creating to avoid last minute stress.


5. Spend less.

You don’t need to spend big. It’s amazing how much money you can save by making your own party ware. All of my party ware was purchased from op shops which I simply spray painted gold.


Below are her some of her DIY How to’s

Cake Stand

You will need: A glass plate, a glass that is able to hold the plate, spray paint & super glue.

I’ve seen these made online using porcelain plates. Which would mean you would either need to leave the upside of the plate unpainted or risk the spray paint chipping during use/washing. I thought it would be much easier to use a glass plate, meaning I’d only need to spray paint the bottom of the plate and the colour would show through the top. Once both the glass and plate have been sprayed and dried, use a strong super glue to join the two. Place some weight on top and allow the glue to set and wa-laa, you have yourself a cake stand in the colour of your choice! I made 4 glass cake stands for the day which cost approximately $25! Candle holders are also great to use for this in place of a glass.

Napkin Rings

I found 8 of these gorgeous napkin rings at an op shop and wanted to use them on the table to serve food. I was first going to make paper cones to sit inside, but then a friend suggested I sit shot glasses inside. I sprayed the rings gold, and found perfectly fitting glasses – too easy!

Vase

This is actually a tall candle holder found in an op shop for a few dollars. I simply spray painted the black metal that sits inside the glass.


Event stylist: Jellybean in my closet
Event Photography: Sibella
Cake/desserts: Eda


  • Mar
  • 27
  • 2013

Shaynna Blaze judged my room and I won!

A few weeks ago (thanks for a friend who mentioned it to me), I entered a competition run by The Interiors Addict blog, “Impress Shaynna and win a course at the International Institute of Home Staging worth $500”. Yes, Shaynna Blaze from The Block on channel 9 is judging, who am I kidding?!

So the nature of competitions are… that there will probably be hundreds or thousands of entries and what would the chances of winning be? But this morning as I scrolled down Facebook on my phone in bed, I saw my photo posted by Interiors Addict! I was shocked. Surprised. Happy – 0f course! I’m very happy to announce that I was chosen as the winner for this amazing competition. As part of this win from Interiors Addict, I am posting this makeover on my blog to show you more photos of my toddler room transformation and how you can achieve amazing results with a minimum budget using recycled materials, found objects with lots of research, passion and determination!

This is a typical 60’s house. Very retro, lots of patterns. It can sometimes be a bit overwhelming to the eye. When I was pregnant with my second, I told myself I needed to finish off the spare room. At the time, it was being used as an ironing room, a computer room, a storage room and what not! So when my morning sickness slowly faded away, I got myself together and started planning for this room. My first borns’ room was a very girlish room. This time I wanted something different. I opted for a unisex look incase I was expecting a boy.

The room is a work of art in itself. All decorations are DIY from salvaged items and recycled materials. From the wall art down to the cushion details & baby mobile, all are handmade! It took me a few months to research, gather and create these beautiful items.

This baby mobile was created with paint chip samples. I have a box of them in the shed so all I had to do was cut probably about 30 of them using a heart template I made. These are then sewn using a needle and a thread, attached onto tree branches that I cut off a tree in our backyard. They are finished with a small bead at the end just to give each string-piece some added weight.

What is a room without cushion? They are ridiculously overpriced in stores, $30-$60! I have made these adorable cushions for only a few dollars!

I have most of the fabrics at home so it was just a matter of buying some felt.

The bottom cushion was made from an old granny jumper! I will put some photos up in another post of how I made this cushion. The table was an old IKEA table that I repainted. The timber tray was bought from a second hand store for $3, again repainted in the same colour as the feature wall. The lamp was bought from Salvos (second hand store) for $10, it even has a chip at the bottom, yes, and I love that it has a chip to show imperfection! Another IKEA product which is the rug, RRP is $49 but I got it for $25 from Gumtree :)

This is a digital artwork that I have created and now am selling in my Etsy store.

The picture below is a breakdown of what in the room is second hand and DIY.

Side view of the room. The bed belonged to my sister in law, 15 years ago. My in laws managed to keep it well in their garage. Its now time for my children to benefit from it!

My hand painted ‘bird silhouette’ oversized canvas.

I am absolutely in love with this no 14 chair! Its an original chair (still has the stamp on it!) Its by Thonet and made in Czechoslovakia! I was pretty lucky to have found this chair after months of searching. The owner didn’t know it was an antique, so she was happy to give it away.


  • Feb
  • 19
  • 2013

DIY Wall art for living room nook

When the husband wants something, he just has to say the word and then I’ll take care of the rest. This time he wanted an armchair, for more comfort.

I wasn’t exactly sure where else I could put this extra armchair seeing that our living room isn’t a big room, so I had to compromise some things and move around. The photo below was the old living room decor nook, where the floor lamp is. And this is where the new armchair will go.

So when we put the new armchair there and moved the floor lamp to the opposite nook (gotten rid of the magazine rack), the walls behind the armchair looked rather plain. I decided to DIY some art from the stuff we already had and picked up a couple of things from the junk yard. I got this timber tray for $2.50 each.

Above: Sanded timber tray (before)

Below: During the process of painting

The picture below are the 3 DIY wall art.

1- Exsiting Ikea MALMA mirror that I stencil and painted with a quatrefoil design.

2. Junk yard timber tray turned wall art – digital design print.

3. Junk yard timber tray turned wall art – hand painted.

For the quatrefoil mirror, I cut out a stencil and traced it all around the mirror with a pencil.

Then using acrylic paint, painted it with love and care.

Here is a close up of the timber trays, they are painted to make it look a bit rustic

As for art #2, Its a digital design art that I made in illustator and printed it out. I’m also selling it in my Etsy store.

The cushion was purchased online from eBay.


  • Oct
  • 29
  • 2012

{before + after} DIY quatrefoil table stencil

This is our revamped side table with a quatrefoil design. Lately I’ve been into contemporary Moroccan latticework patterns. They are absolutely pretty!  I’ll show a step by step on how to stencil this table. There are a couple of ways to do it, either paint it with your bare fingers (using a template or use a sticker stencil) I’ll show you the stencil way. First, get yourself an old table. We picked this up from an ad on Gumtree for $15.

I measured the diameter of the table and whipped up the patterns on illustrator. Feel free to download the pattern template here. I made it available in a PDF version so the vector works remain if you wish to resize it.

Then print it out onto sticker paper and using a stanley knife or scissors, carefully cut out the stencil template.

Give the table a good sand thoroughly.

Paint the base colour, I chose a light grey. Give it two coats.

Once dried, apply the sticker stencil. Press to make sure they are no bumps. And finally spray it white, two coats again. Leave it to dry for a day before removing the stencil.

Once you remove the stencil, sand the edges using a fine sand paper to enhance the edges and also to give it a rustic look.

And now we’re done!

Total cost of project:

Side table $15
Spray paint $3
Sticker paper $2

Final total:$20. An absolute bargain!

It makes for such a pretty indoor or even outdoor side table.


  • Mar
  • 30
  • 2012

living 101

living1

So I finally managed to finish off our living room. I kept changing my mind and the decor along the way but I knew I’ve always wanted a bright, serene room hence no wallpaper or paint was used. The furniture and decor speak for themselves. The reason why I changed it 101 times is because going from a newborn who pretty much doesn’t touch anything to having a super energetic toddler, I had to remove/reposition many decor items. They either were given away, stored in the garage or placed at a higher level. I also had to be careful to not over-do or under-do in terms of decoration. And also because most items are not brand-new-straight-from-the-stores-costing-me-a-bomb, it took me a while to source them. I did quite a bit of research and looked around second hand shops/ebay/gumtree and even managed to scavenge things found on the street. This is me and I am proud of it, I simply love recyclable materials!

living2

Our living room is not the best shaped room for a living/lounge… very rectangular and long, which makes furniture positioning a bit tricky. If you see the before photo, two pieces of bulky furniture were placed in front of each other making the room feel tight and crowded.  Of course when you have guests, that’s probably the way to go however this wasn’t our concern. We (the family) spend more time in this house so we had to make it a functional space for us to live in. We wanted the TV right in front of our comfy couch. Yes! That dark brown couch is super comfy. And sorry, I wasn’t able to fit a picture of the TV in the photo, but just imagine it sitting opposite the brown couch. Considering the living room is pretty small, we could fit 7 sitting people without it looking crowded. Woohoo, problem solved!

living3

The old wall gas heater is not fully working and it would cost us an arm and a leg to get it replaced, so we decided to scrap that and position a light beige couch in front of it. More space saving for us! We also installed a split system heating/cooling above the fireplace and are now looking to get underfloor ducted heating throughout the house. Melbourne can get very cold in winter and one heater isn’t going to heat up a whole house!

living7You can find the post for this hand sewn ‘love’ cushion here. Note: I did not make the cushion cover, it came with one of the couches we bought from Gumtree.

living4

For the mantel piece decor, I made this lovely frame with chalk writing and the post can be found here. Its very easy, just pick up a frame from a second hand store or a timber yard.

living5

living6

I am yet to make a post about this gorgeous timber scrap “Bismillah” art, which translates to ” In the name of Allah” in Arabic. I hope you’ve been thoroughly inspired. Its nothing glamorous, just a simple and functional space as I like to call it.

Related Posts Plugin for WordPress, Blogger...


Copyright © inmystudio by Iva Izman, 2009 - 2012. All Rights Reserved.