Posts Tagged With 'cake'

  • May
  • 24
  • 2015

new york cheesecake

new york cheesecake


This is the best baked cheesecake ever. Like ever! For years, I baked so many cheesecakes and finally have found a recipe that I am happy with, again, thanks to my amazingly talented sister who made this cake a while back, I am now hooked on it. It is so soft, moist, creamy and not overly sweet. I think it has the perfect balance of sweet and sour (from the raspberry coulis)


RECIPE FOR BAKED NEW YORK CHEESECAKE Adapted from A Glutton in London with slight modifications Serves: 12 Cook time: 1 hour Cool time: min 4 hours (preferably overnight) Ingredients

3 tbsp melted butter
1 packet Scotch finger or any biscuit of choice (about 200grams)
3 tbsp plain flour
1/2 cup sour cream
2 tsp vanilla extract
2 blocks of Philadelphia cream cheese
1 cup white sugar
1/3 cup milk
2 eggs
1 tsp finely grated lemon zest
1 tsp finely grated orange zest

Method

1. Preheat oven to 160ºc. Fan forced.
2. Lightly grease a 22cm springform pan and lined with baking paper.
3. Mix biscuits and melted butter in a bowl until evenly moistened. Press crumb mixture into the bottom evenly.
4. Whisk flour, sour cream and vanilla extract in a bowl, and set aside.
5. Stir cream cheese and sugar with a wooden spoon in a large bowl until evenly incorporated, about 3 to 5 minutes.
6. Pour milk into cream cheese mixture and whisk until just combined.
7. Whisk in eggs, one at a time, stirring well after each addition.
8. Stir in lemon and orange zests, and sour cream mixture. Whisk until just incorporated.
9. Pour mixture into springform pan and bake for about an hour, when the edges have puffed up slightly and the surface of the cheesecake is firm except for a small spot in the middle which should jiggle when the pan is gently shaken.
10. When the baking time is over, turn off the oven and let it cool in the oven for 3 to 4 hours to prevent cracks in the cheesecake. This is really important, and my cheesecake did not crack at all! woohoo!
Ingredients for coulis
1 cup raspberries
1/3 cup caster sugar
1 tsp lemon juice
Method for coulis
1. Add all ingredients in a small saucepan and stir until incorporated.
2. Leave to cool for 15mins before blending it,  finally put it through a sieve and serve!


  • Apr
  • 06
  • 2015

tiramisu

Tiramisu is an all time favourite in our house. I don’t drink coffee (yes I’m weird), but I can certainly wipe off a whole tray of tiramisu! This recipe was passed from an old friend 5 years ago when I told her I don’t consume anything with coffee! So she gave me a tray of tiramisu and since then, I have made this countless of times and it has always been a crowd pleaser. Her original recipe has eggs, so I had to modify it because when you’re pregnant, you can’t eat raw eggs. And it tastes amazing with or without eggs! Give it a go and let me know!


RECIPE FOR EGGLESS TIRAMISU
Adapted from an old friend, with modifications
Serves: 12
Prep time: 30 mins
Chill time: min 6 hours (preferably overnight)

Ingredients for Tiramisu

1 large packet of sponge fingers (500 grams)
3 tablespoon of boiled water
5 tablespoon of coffee
1 to 1.5 cup milk
1/4 cup caster sugar
250g tub mascarpone cheese
300ml whipped cream (I use thickened and just whip it)
1 tablespoon cocoa powder for dressing

Method for coffee mixture (to dip sponge fingers in)

In a medium sized bowl, mix 3 tbsp of boiled water with 5 tbsp of coffee until dissolved. This becomes really thick, and then reserve in 2-3 tbsp in a small cup (this is to add to the cream mixture later). With the remainder coffee mixture, add milk, stir and keep aside.

Method for cream mixture

In a mixing bowl, whisk together mascarpone and cream. Slowly add in the coffee mixture that you reserved earlier and incorporate it into the cream mixture. Whisk until becomes a nice smooth, thick cream.

Method for assembling cake

1. You will need a rectangle serving tray 9×13″ (23x33cm),  at least 2″ deep (5cm).
2. Dip the sponge fingers in to the coffee mixture, quickly turning both sides and layer them onto the tray.
3. Add the cream mixture on top of the biscuits and then sift the cocoa powder evenly.
4. Repeat step 2 & 3.
5. Chill for at least 6 hours, or preferably overnight. I like to chill mine 24 hours before I serve.


  • Mar
  • 02
  • 2014

blueberry lemon buttercake

Every Saturday, I try to make an effort to bake with my eldest daughter who is nearly 4 mashallah.  So this morning we made a buttery blueberry lemon pound/loaf cake. Its very soft and moist, absolutely delicious! Dare I say much better than bought ones!

I love mine with a cup of tea but my husband thinks its better with a glass of milk. What do you think? A slice with tea or milk?


RECIPE FOR BLUEBERRY LEMON BUTTERCAKE (POUND CAKE)
Adapted from this recipe
Makes: 1 loaf
Bake time: 60 mins

Ingredients
1 cup fresh blueberries
113 gram butter (1 stick)
½ teaspoon salt
1 cup caster sugar
3 large eggs
2 tablespoon lemon juice
¼ teaspoon baking soda
1 ½ cups plain flour (all purpose)
½ cup sour cream (or yoghurt)

Method

1. Put the berries in the freezer for about 30 minutes to freeze – this will help keep them from staining the batter.
2. Preheat oven at 325°F (160 degrees fan forced)
3. Spray a loaf pan with cooking spray and lined with baking paper.
4. In a stand mixer with the paddle attached, cream the butter and salt.
5. Slowly add the sugar and continue beating for another 3-4 minutes.
6. Add the eggs one at a time letting the mixer go for 30 seconds after each egg. Scrape sides of bowl often.
7. Add the lemon juice.
8. Scrape sides of bowl and add baking soda. Stir well.
9. Add flour and sour cream (or yogurt) alternately to batter, stirring until blended. Remove bowl from the stand, toss the frozen blueberries in the remaining batter.
10. Spoon the batter into the prepared loaf pan.
11. Bake the cake for 60 minutes or until a skewer inserted into the centre of the cake is clean.
12. Set the cake on a rack to cool for about 10 minutes.
13. Turn the cake from the pan and let cool completely.


  • Jul
  • 22
  • 2013

{guest post} Gold 4 Glamour Party


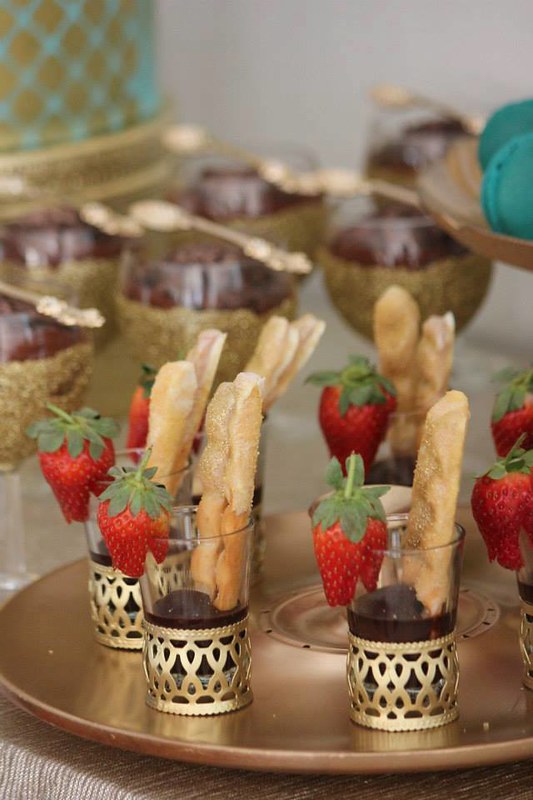
I have always admired her DIY creations, and when this one came up, I said to myself I have to feature this on my blog! This party was styled by my friend Elcin from Jellybean in My Closet for her dear sister. Delectable mouth watering desserts were made by Eda and photography by Sibella .

She has named her event Gold 4 Glamour. The colours Elcin has chosen for this event are simply glamorous, vibrant and exciting! What I am impressed most about this party styling is that Elcin pretty much DIYed most of the items on the dessert table herself, from things that she found from second hand shops such as a napkin ring- she turned them into dessert cups. Such an innovative idea!


Since Eid is coming up, I thought I’d let her share some of her DIY tips and How To’s. Below are her 5 top tips on creating a successful DIY Tea Party.


1. Keep it simple.

When it comes to party décor, you’re either making a statement piece (wall art, centrepiece etc) or multiples of something (drink bottles, hanging décor etc). For this reason, I recommend keeping the process of making it simple. If there is an easier way of doing something, go for it!


2. Google!

Whenever I have a DIY idea, I get onto Google or Pinterest, because 9 times out of 10, somebody else has already thought of the same idea. You can pick up some great tips and things to avoid when attempting your DIY.


3. Think outside the square.

Look at pieces from a different angle. When I saw the napkin rings & the candle holder at the op shop, I fell in love. I knew I didn’t need them for the purpose they’ve been made but began to think of how else I could use them. The napkin rings made a fantastic dessert cup and the candle holder a pretty vase!


4. Plan it.

Once you have done step 1-3, now you can plan it! Choose your theme. Once I have a theme in mind, I look around my house to see what items will work with my theme. You’ll be surprised as to what you have! Time is imporant. If you are planning an event 3 months down the track, plan for it 3 months ahead. The planning and preparing won’t take you 3 months, (the gold party prep took no more than 1 week) but at least you will be giving yourself plenty of time for shopping and creating to avoid last minute stress.


5. Spend less.

You don’t need to spend big. It’s amazing how much money you can save by making your own party ware. All of my party ware was purchased from op shops which I simply spray painted gold.


Below are her some of her DIY How to’s

Cake Stand

You will need: A glass plate, a glass that is able to hold the plate, spray paint & super glue.

I’ve seen these made online using porcelain plates. Which would mean you would either need to leave the upside of the plate unpainted or risk the spray paint chipping during use/washing. I thought it would be much easier to use a glass plate, meaning I’d only need to spray paint the bottom of the plate and the colour would show through the top. Once both the glass and plate have been sprayed and dried, use a strong super glue to join the two. Place some weight on top and allow the glue to set and wa-laa, you have yourself a cake stand in the colour of your choice! I made 4 glass cake stands for the day which cost approximately $25! Candle holders are also great to use for this in place of a glass.

Napkin Rings

I found 8 of these gorgeous napkin rings at an op shop and wanted to use them on the table to serve food. I was first going to make paper cones to sit inside, but then a friend suggested I sit shot glasses inside. I sprayed the rings gold, and found perfectly fitting glasses – too easy!

Vase

This is actually a tall candle holder found in an op shop for a few dollars. I simply spray painted the black metal that sits inside the glass.


Event stylist: Jellybean in my closet
Event Photography: Sibella
Cake/desserts: Eda


  • Jul
  • 18
  • 2013

Freebie #2 – DIY Eid Cake Flags, Cupcake Wrappers & Toppers

Our second week FREE DIY Printable are for “Eid Sweets”!
*You may download this printable at the end of post*

Freebie #2 – Printable DIY Eid Cake Flags, Cupcake Wrapper & Toppers


Our first week DIY Free printables were quite a hit, Alhamdulillah. I cant wait to see more photos of them in use. Sweets are the BIGGEST HIT during Eid celebrations. It is not Eid until you have sweets and desserts on the table. In fact, every house we visit during Eid, will have delectables sweets/dessert served to us. It is definitely a day to indulge and a day to forget that you’re even on a diet!

P/s: And if you want my salted caramel macadamia cheesecake, you’ll have to wait a couple of days as I will be guest blogging on another blog with the recipe…stay tune :)

Recipe is published on My Halal Kitchen! Click here to view more photos and the recipe!

I know Eid is still a few weeks away,but prepare ahead! I suggest you print these PDF’s, make and store them in a safe place; because trust me, as a mother, I know how hectic a few days before Eid can be. Mountains of present shopping and wrapping, baking, cooking, cleaning, decorating…everything hits us all at once! So by preparing them in advance, it saves you the headache + heartache + rushing around. All you need to do on the eve of Eid is simply put these toppers on your cake/cupcake and you’re good to go! This reminds me of a story that happened last year, I was at Kmart at 10pm on the eve of Eid because I had forgotten to buy something. So this Eid, I am planning ahead…In Sha Allah :)


Step by Step: How to make Cake Flags

Materials needed for this DIY project:

1. This printable template (3 pages including instructions)
2. A4/8×12” White paper (200 gsm/110 lb +)
3. Ruler
4. Cutter or scissors
5. Glue Stick
6. String/thread

Using scissors or a cutter, cut the template.

Apply glue to the back. I find using a glue stick easy as its not messy and runny.

Fold it in half then put your string/thread in the middle and closed the flaps to form a triangle (joining at both ends).

Your finished product- cake flags. If you make this weeks in advance before Eid, be sure to keep them in a safe place, away from kids as they are quite delicate once they are on a string.


Step by Step: How to make Cupcake Wrapper


Materials needed:

1. This printable template
2. A4/8×12” White paper (200 gsm/110 lb +)
3. Scissors
4. Double sided tape

Firstly, cut out the wrapper template.

Then, put some double sided sticky tape on one end. Then fold the ends to close.

You may now insert your cupcakes into these wrappers.


Step by Step: How to make Cupcake Toppers/Straw Flags


Materials needed to make cupcake toppers:

1. This printable template
2. A4/8×12” White paper (200 gsm/110 lb +)
3. Ruler
4. Cutter and scissors
5. Bamboo Sticks/Tooth picks/Straws
6. Double sided tape

Firstly, cut your toppers according to template.

Then apply double sided tape to the back.

Fold it in half and then put your stick or straw in the middle. Fold to close (joining at both ends).


Your finished product-decorate away! Dont forget to share photos of your creations on my Facebook page!


Related Posts Plugin for WordPress, Blogger...


Copyright © inmystudio by Iva Izman, 2009 - 2013. All Rights Reserved.